How to Go Live on Instagram: Everything You Need to Know
Before going live on Instagram, you must meet specific requirements to use the feature such as having at least 1,000 followers.
- Any public Instagram account with at least 1,000 followers can go live on IG.
- Prepare for your IG Live with a strong internet connection, good lighting and clear audio.
- Features like guest invites, pinned comments and question stickers boost interaction.
Going live on Instagram connects you with your audience in a raw, real and interactive way. From influencers sharing behind-the-scenes moments to brands hosting product launches and Q&A sessions, Instagram Live (IG Live) has become a go-to tool for building community and boosting engagement in real time. We’ll walk you step-by-step through how to start, manage and maximize your Instagram Live sessions so you can go live with confidence and keep viewers coming back for more.
What Is Instagram Live?
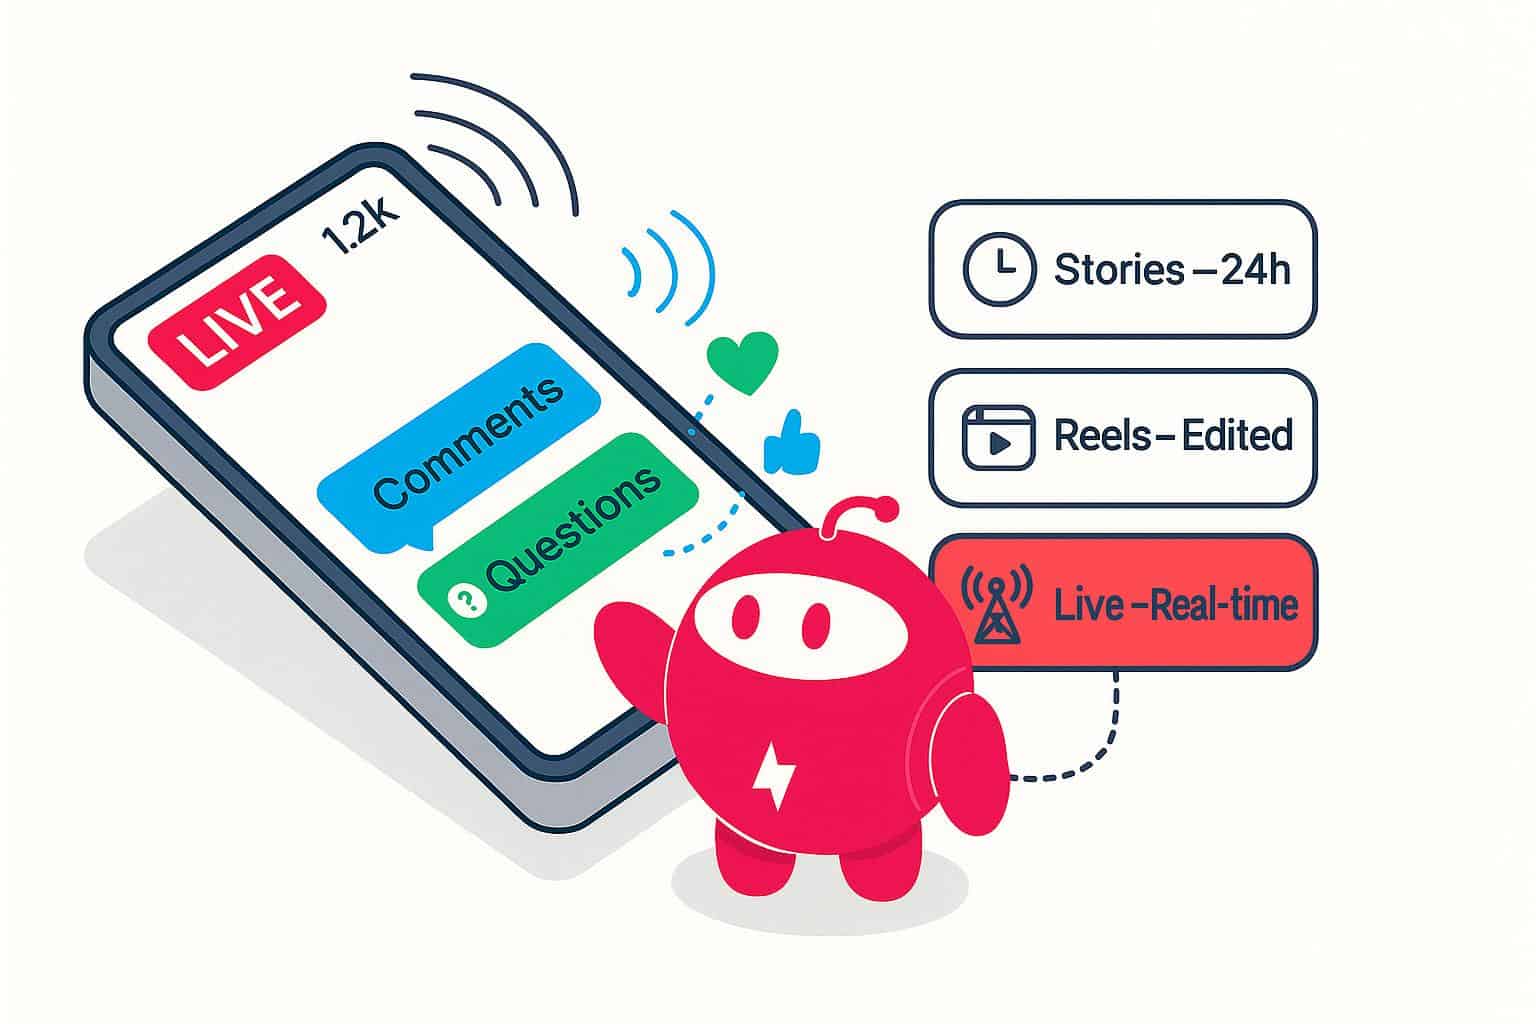
IG Live is a feature within the Instagram app that lets you broadcast video in real time to your followers. You can access it directly from the app, similar to how you would share a new post, and swipe to the Live option. Unlike Stories, which are short, pre-recorded clips that disappear after 24 hours, or Reels, which are polished, algorithm-friendly short videos, IG Live is unscripted and interactive. You can engage with viewers instantly through comments, questions and reactions as they happen. This immediacy is what makes it such a powerful tool for authentic, two-way communication.
What You Need Before Going Live on IG
Before going live on Instagram, it’s worth making sure you have the right setup so your broadcast runs smoothly. You’ll need the Instagram app installed on a mobile device and use the latest version of the app to avoid glitches. A stable, high-speed internet connection — ideally via Wi-Fi rather than cellular data — prevents lag or dropped streams. Check your internet plan to ensure you have enough bandwidth to handle a livestream. Ideally, a seamless livestream requires a minimum of 20 Mbps.
While you can go live with just your phone, consider using a tripod or phone stand for steady framing, as well as an external microphone or earbuds for clearer audio. Good lighting, whether from natural daylight or a ring light, can make a huge difference in the professional appearance of your stream.
Along with the tools, you’ll need to meet Instagram’s requirements for going live: You must have a public Instagram account with at least 1,000 followers to start a Live broadcast. Teen Accounts are unable to start a live broadcast by default.
How to Go Live on Instagram

Going live on Instagram is straightforward, but the exact steps can vary depending on whether you’re using an iPhone or Android device. The core process is the same — you’ll start from the Instagram camera, select the Live option, and then begin your broadcast. Small differences in menu layouts or button placement can occur between devices and app updates. Below, we’ll walk you through the step-by-step process for both iOS and Android (and tips on how to go live on a computer) so you can launch your first IG Live with confidence.
How to Go Live on Instagram Using an iPhone
Using the latest version of the iOS Instagram app, here’s how to go live on IG:
- Open the Instagram app.
- On the bottom menu bar, click the + icon.
- Add a title for your live.
- Click the circle button in the bottom center with the broadcast icon.
How to Go Live on Instagram Using an Android
Using the latest version of Android’s Instagram app, follow the steps to start your IG live:
- Open the Instagram app.
- On the bottom menu bar, click the + icon
- Add a title for your live.
- Click the circle button in the bottom center with the broadcast icon.
How to Go Live on Instagram Using a Computer
Instagram’s app doesn’t offer a built-in option to go live from a computer, but you can still stream from your desktop or laptop using third-party tools that connect to Instagram’s Live Producer. Platforms like StreamYard or Restream let you broadcast via a webcam or connect more advanced equipment, giving you greater control over video quality, overlays and multiple camera angles.
You’ll typically log into Instagram Live Producer through your desktop browser, copy the stream key it provides, and paste it into your third-party streaming software. This setup is handy for webinars, interviews or live events where you want a polished, professional look that goes beyond what’s possible with a phone. These third-party tools also enable you to go live simultaneously on multiple social media platforms, allowing you to engage with your community wherever they may see your content. You’ll still need a stable internet connection and to follow Instagram’s Community Guidelines to avoid having your stream cut short.
How to Go Live With a Guest
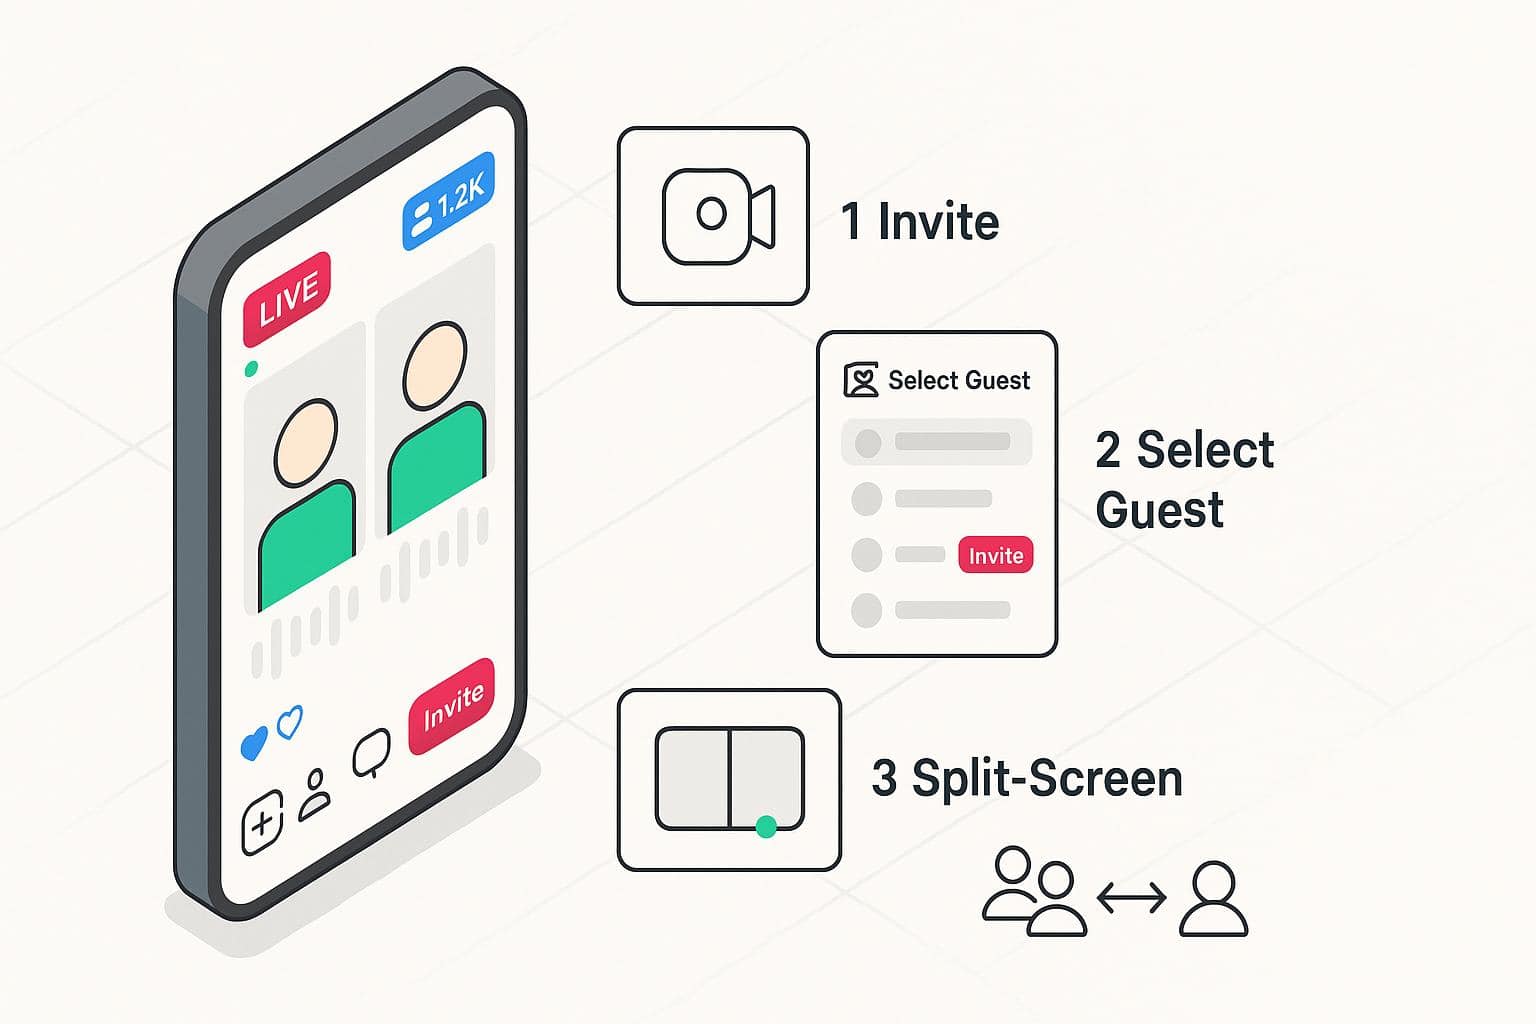
Going live with a guest on Instagram is a great way to make your broadcast more engaging and conversational. Once you’ve started your livestream, you can invite someone to join by tapping the icon of a camera with a plus sign in the middle, and then clicking the icon of a person with a plus sign next to it to invite someone to join. From there, select the person you want to invite from your viewers list or search for their username.
When they accept, the screen will split into two — your video on one side and theirs on the other — so both audiences can watch and interact in real time. This feature is perfect for interviews, collaborations, co-hosted Q&A sessions, or casual chats between content creators, giving your viewers two perspectives at once. It’s also a great way to cross-promote, as your guests’ followers get notified when they join your live stream.
Tips for Running a Successful IG Live
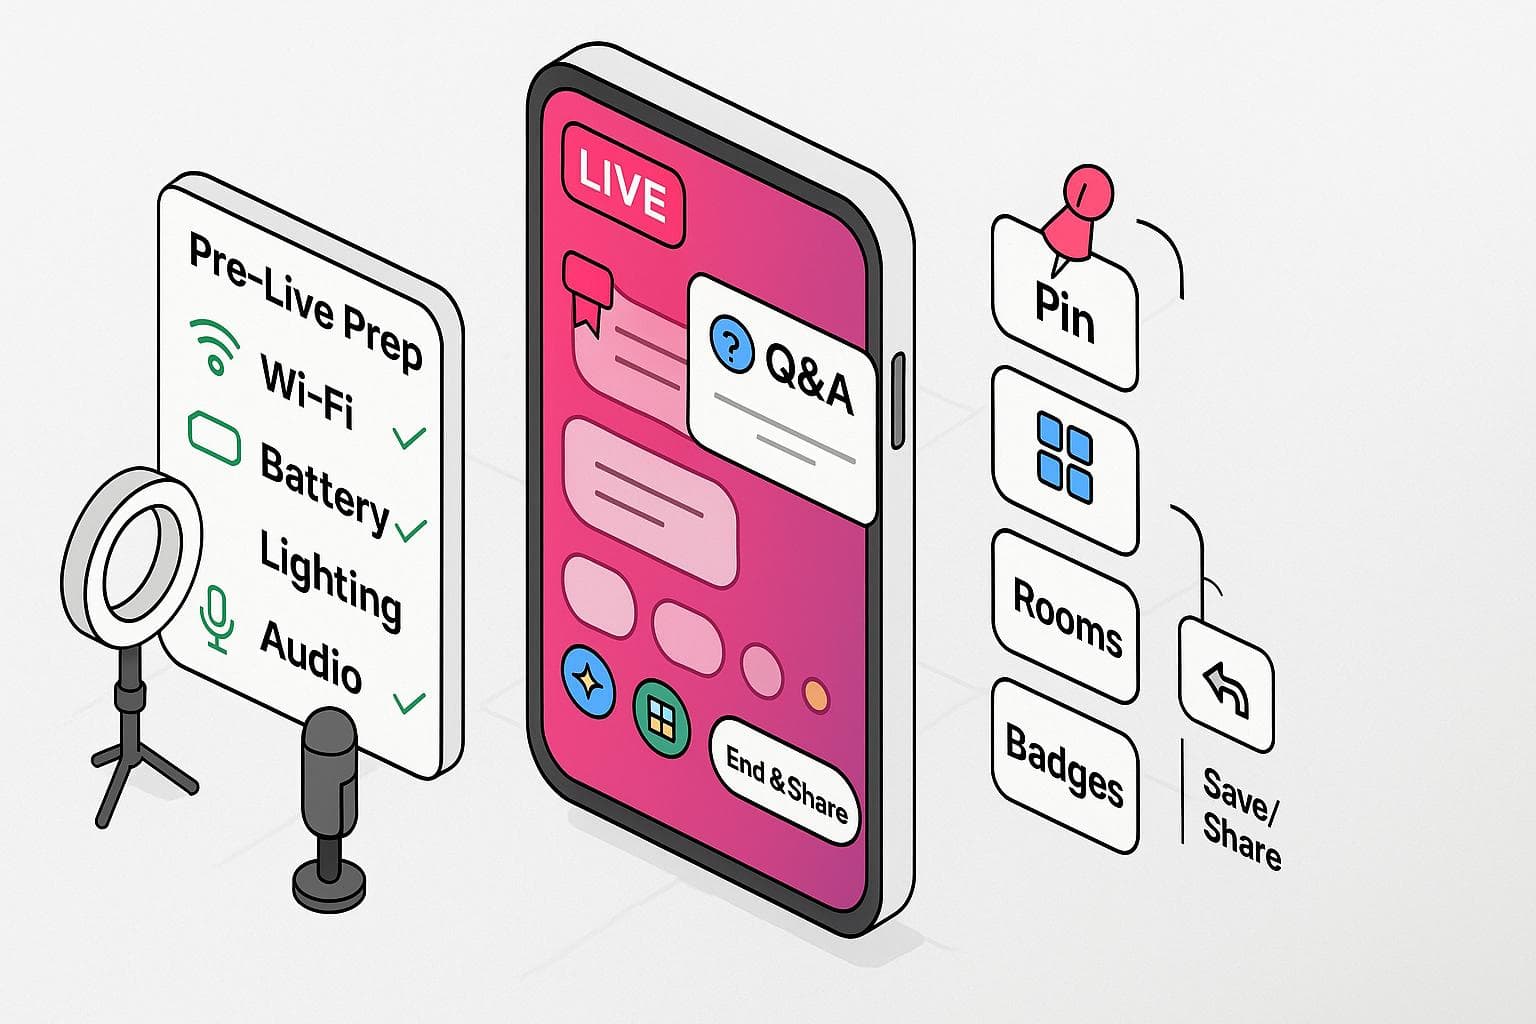
If you want to make your Instagram Live session as engaging and effective as possible, a little preparation goes a long way. Start by promoting your live in advance by posting about it in your Stories or feed. You can even schedule your live using Instagram’s built-in reminder feature so followers know when to tune in.
Put together a loose outline or talking points so you stay on track, but don’t be afraid to embrace spontaneous moments — that’s part of the appeal of live video. Make sure you have a fully charged phone battery and check your Wi-Fi connection to avoid interruptions. You’ll want to have good lighting and clear audio throughout, so have your ring light and microphone charged (if applicable) beforehand, too.
Once you’re live, greet viewers by name as they join and encourage them to ask questions or share comments to keep the conversation interactive. As you wrap up, summarize the key takeaways, thank your viewers, and remind them where they can find more of your content. The goal is to make every viewer feel like they were part of something valuable and worth coming back for.
How to Use Common IG Live Features
Instagram Live features built-in tools that help you engage your audience and manage your stream more effectively. Here are some of the most useful ones to know:
- Comments and pinned comments: Viewers can type messages during your livestream, and you can reply in real-time. If you have an important link, topic or question you want to highlight, tap and hold a comment to pin it to the top of the chat so everyone can see it.
- Question sticker: Before going live, you can collect questions via your Stories using the Question sticker. Once live, tap the question mark icon to display and answer them on screen, which keeps your session organized and ensures you address popular topics.
- Filters and effects: Add fun or on-brand visual effects to your video with Instagram’s filters. These can help set the tone without needing heavy post-production.
- Live rooms: Invite up to three additional guests for a group broadcast. This is perfect for panel discussions, collaborative events or multi-host Q&A sessions.
- Badges: If your account is eligible, turn on Badges so viewers can purchase small icons to show their support during your livestream. It’s a simple way to monetize your streams while building a loyal audience.
- End and share: When your live ends, you can save and share it to your feed or Stories so people who missed it can still watch. This extends your content’s reach well beyond the live audience.
How to Troubleshoot IG Live Issues
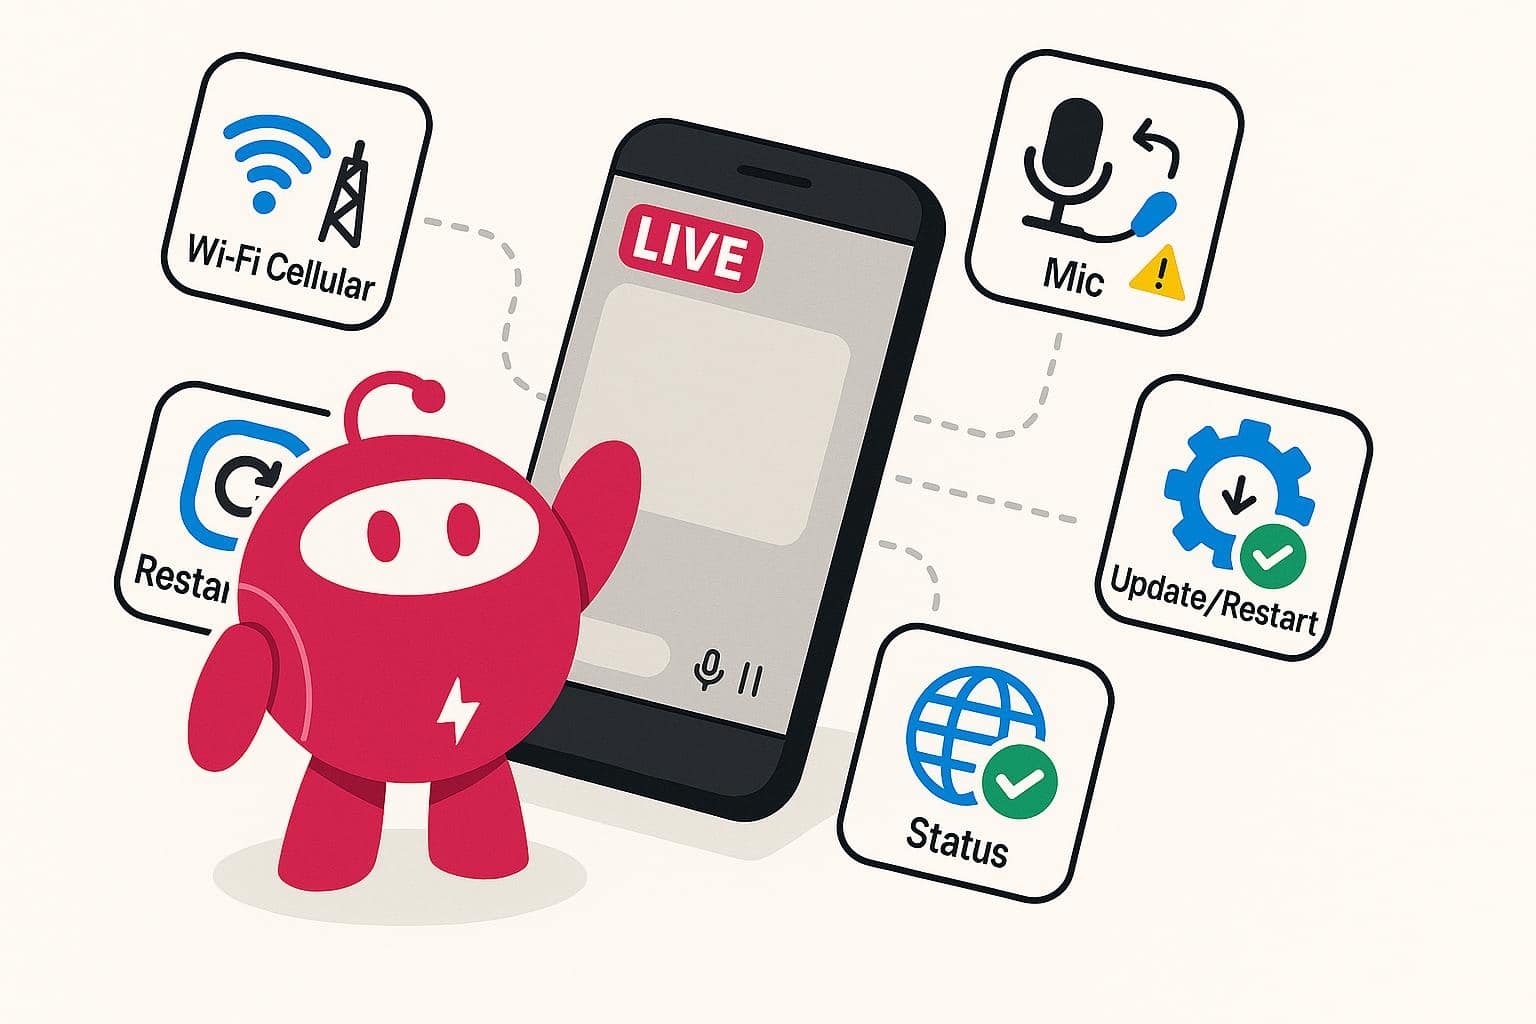
Tech hiccups can happen during an Instagram Live, even when you’ve prepared ahead of time. Knowing how to troubleshoot common issues can save your stream from issues. Check your internet connection if your video is lagging or freezing. Switching from cellular data to a Wi-Fi network (or vice versa) sometimes solves the issue. If audio is distorted or cutting out, try unplugging and replugging your microphone or earbuds, or switch to your device’s built-in microphone. If the app itself glitches, try closing and reopening Instagram, or logging out and then logging back in.
In rare cases, you may need to update the app or restart your device. If the problem persists, check Instagram’s official status page or social channels to see if there’s an outage. Tech issues can be stressful, but the key is to stay calm, address the issue transparently with viewers, and get back on track as quickly as possible so the flow of your broadcast isn’t lost.
Frequently Asked Questions About Going Live on IG
Why can’t I go live on Instagram?
If you can’t go live, it’s usually because your app is outdated, your account has temporary restrictions for violating community guidelines, or your internet connection isn’t strong enough. Some users also find that IG Live isn’t available in their region or on certain devices. Make sure you’re using the latest version of Instagram, logged into the correct account, and connected to a stable Wi-Fi or cellular network before trying again.
Can you schedule an Instagram Live?
Instagram lets you schedule a live broadcast anytime between 1 hour to 90 days in advance. When you create your scheduled event, you can share it as a post or a Story, allowing followers to set reminders to join.
How long can an Instagram Live be?
Instagram Live broadcasts can last up to four hours per session. Once you hit the four-hour mark, the live will automatically end, so it’s best to keep an eye on your timer if you’re hosting a long-form stream. You can always restart another live session if you need additional time with your audience.
Can people watch your Instagram Live after it’s over?
After ending your Instagram Live, you’ll have the option to save and share it to your feed. This allows followers who missed it to watch later, and extends the life of your content beyond the live broadcast. Any interactive elements, such as live comments or reactions, won’t display the same way in the replay, but the core video will remain viewable.
Who can see your Instagram Live?
Because you need a public account to use Instagram Live, anyone can see your livestream. You can choose to go live to only Close Friends for a private session, so only those people will be able to catch your livestream. Otherwise, your livestream is visible to anyone.