How to Livestream With OBS
OBS is often recommended for new content creators and streamers.

- Open Broadcaster Software (OBS) is a well-known streaming software application used by many content streamers, both large and small.
- Although its features may appear intimidating, OBS is easy to set up.
- Once you understand the basics of OBS, you can customize your settings to make your livestream truly unique.
Open Broadcaster Software (OBS) is one of the most popular streaming software used in the world of livestreaming. Most people use it to stream video game content, but it’s also suitable for those who want to stream other types of visual media. While the learning curve may be steep when using its more advanced options, learning the basics of OBS is simple, even for those who have never streamed before. Our guide will help you learn how to use OBS for your recorded videos and livestreams.
Table of Contents
What Is OBS?
OBS is a free and open-source software used for recording and livestreaming. No need to worry about a subscription plan or paying for extra features — OBS is funded by a number of sponsors and backers, making it available for anyone who wants to create their own recorded or live video content. Its software comes with numerous built-in tools and integrations that can further enhance your streaming experience. You can choose to let OBS configure your settings for you through its Auto-Configuration wizard, or dive into the software and fully customize it to your liking.
The best part of OBS is that everything is in one place, so you won’t need much else to start streaming. However, if you’re looking to upgrade your broadcasting experience, consider investing in equipment and tools specifically designed to work with OBS.
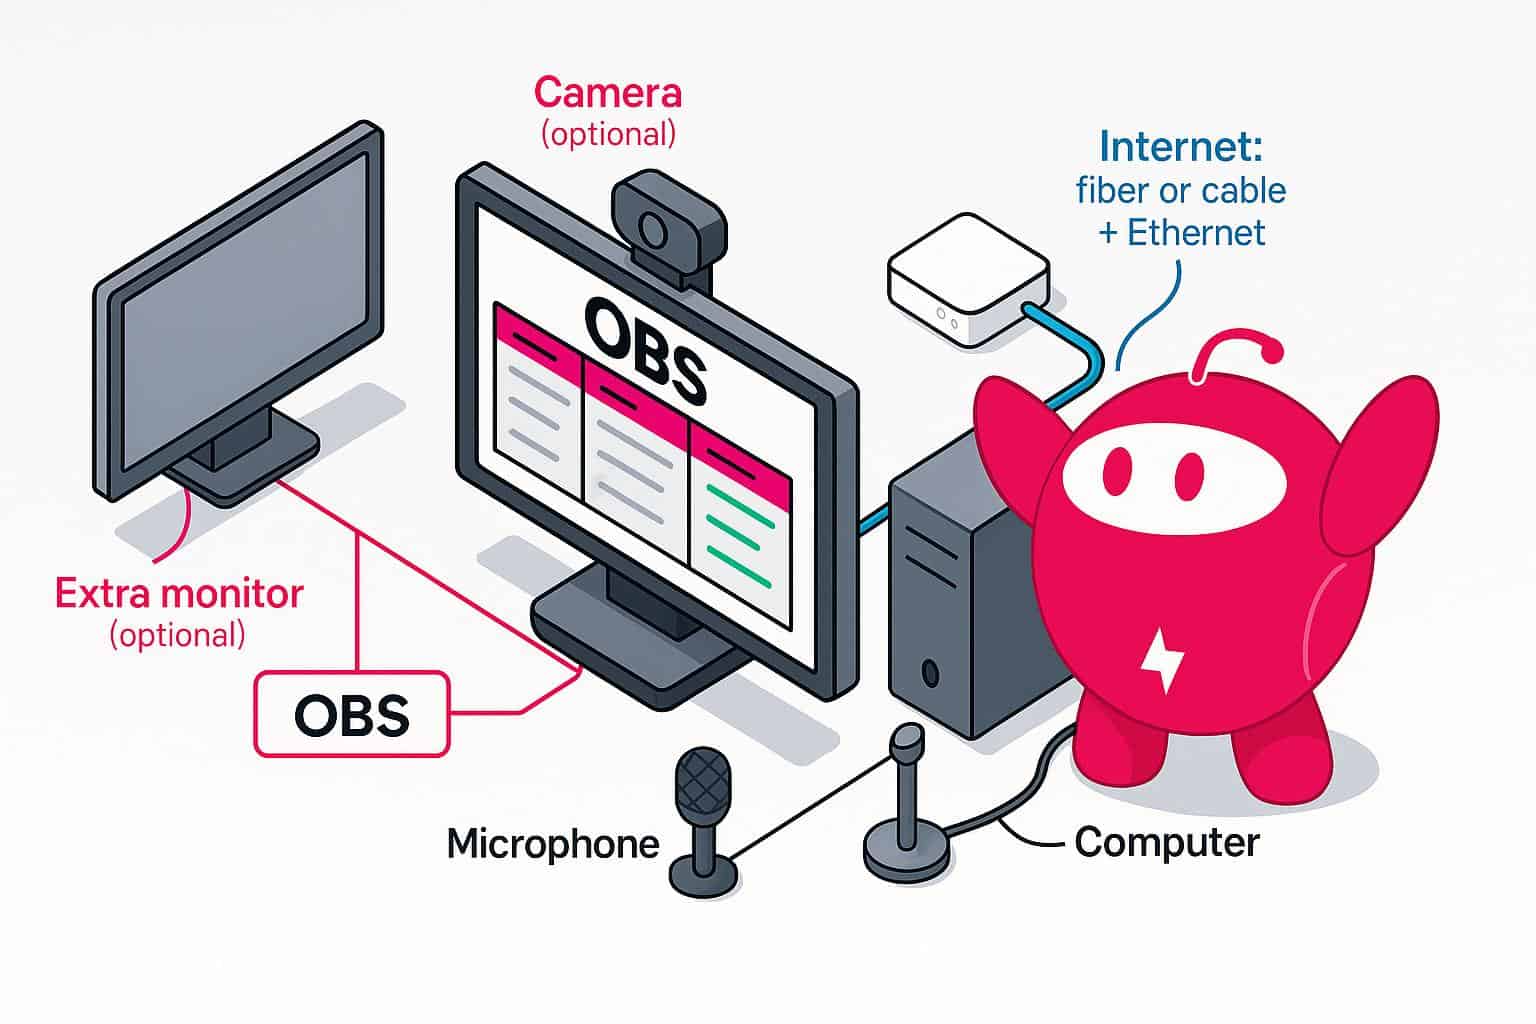
What You Need to Livestream With OBS
OBS Software
First, you’ll need to download and install OBS to start using it. OBS is available on Windows, macOS and Linux, so choose the version that works on the platform you’ll be using. Once you’ve downloaded it, open the application and let it install on your computer. You should then be able to launch OBS.
Computer
You don’t need a super-powerful gaming PC to stream. All you’ll need is a PC that meets the basic requirements to run OBS, which should be compatible with most computers on the market. When choosing a PC, look for models with a good Central Processing Unit (CPU) to ensure your stream runs more efficiently. You’ll also want to consider PCs with a good Graphics Processing Unit (GPU), especially if you plan on running applications or games that are more graphics-intensive.
Internet Connection
Fast and reliable internet is key to running a successful livestream. While it’s not necessary if you’re only recording locally, your viewers will have a significantly better experience if they can watch your livestream without any lag, delays or disconnects. For the best livestreaming experience, it’s best to use either a fiber or cable internet connection. Plugging an Ethernet cable directly into your PC is the most effective way to maintain a stable internet connection.
Microphone
You’ll need to interact with your audience during your livestream, and that requires a microphone. If you plan to use a headset, you can utilize its built-in microphone. Otherwise, an external microphone is a good option — plus, you’ll be able to customize its settings to achieve the best possible voice quality. OBS also provides options within its software to adjust the settings. Again, no need to invest in a fancy or costly microphone — even the most budget-friendly microphones can deliver high-quality sound for your stream.
Camera (Optional)
If you’re an on-camera host or talent, or simply want your viewers to see you during your stream, chances are you’ll want to invest in a good camera. If you’re just starting out, a simple webcam will do just fine. As you continue experimenting with OBS and your stream, consider investing in a camera that will capture your stream with higher quality.
Extra Computer Monitors (Optional)
From the viewer’s end, your stream could look polished and professional. In the backend, however, you may have many moving parts that can make your setup appear cluttered, especially if you’re using one monitor. While it’s not required to run a stream, using a second or third monitor will help you evenly distribute your applications across a wider screen, letting you keep track and manage your broadcast more effectively. Some monitors are expensive, but as long as they can connect to your PC and offer the option to extend your screen, even the more affordable models are suitable.
Recommended Bitrates and Upload Speeds for livestreaming
One important aspect of streaming is determining bitrate. Bitrate measures the amount of data processed over a specific period, typically expressed as “bits per second.” With streaming, bitrate measures the amount of data sent to your designated streaming platform. Having a high bitrate will give you a better-quality stream, but it will also require more internet bandwidth. Generally, the recommended bitrate for livestreaming ranges from 3,000 to 6,000 bits per second.
Similarly, you’ll want a reliable upload speed as you’re livestreaming. When your stream is over, it’s technically “uploaded” to your channel and saved as a video on demand (VOD), so a high upload speed is crucial if you want your channel to replay your streams in the best quality. Ideally, you’ll want a minimum upload speed of 12 Mbps for livestreaming.
Downloading and Installing OBS
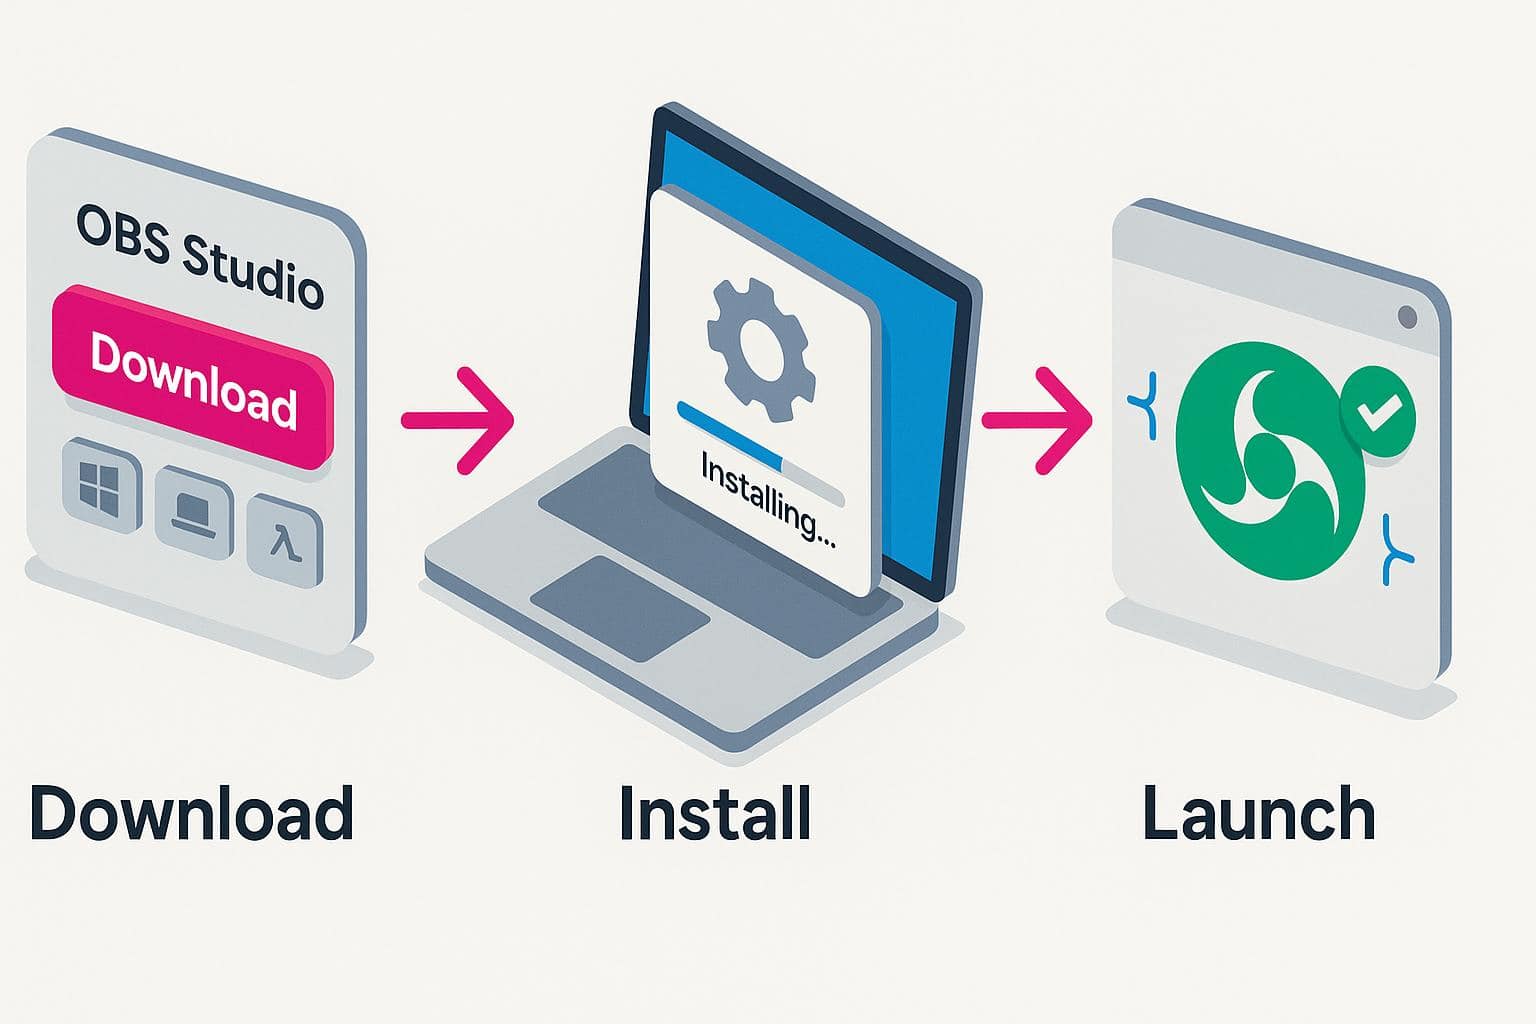
Downloading and installing OBS only takes a few steps:
- Go to the official OBS website and click on the Download page.
- Click on the icon that corresponds to your operating system to download OBS Studio.
- You can also download OBS Studio directly from the homepage.
- Once fully downloaded, open the OBS Studio Installer and follow the instructions according to your application.
- Once you’re done, double-click on the OBS Studio app to launch the program.
Setting Up OBS for Your First Stream
Congratulations! You’ve successfully installed OBS Studio. The next step is to set up OBS and gather all the necessary components to build your stream screen. With OBS, every part of your stream is customizable, from what you show on the screen to how you sound through your microphone.
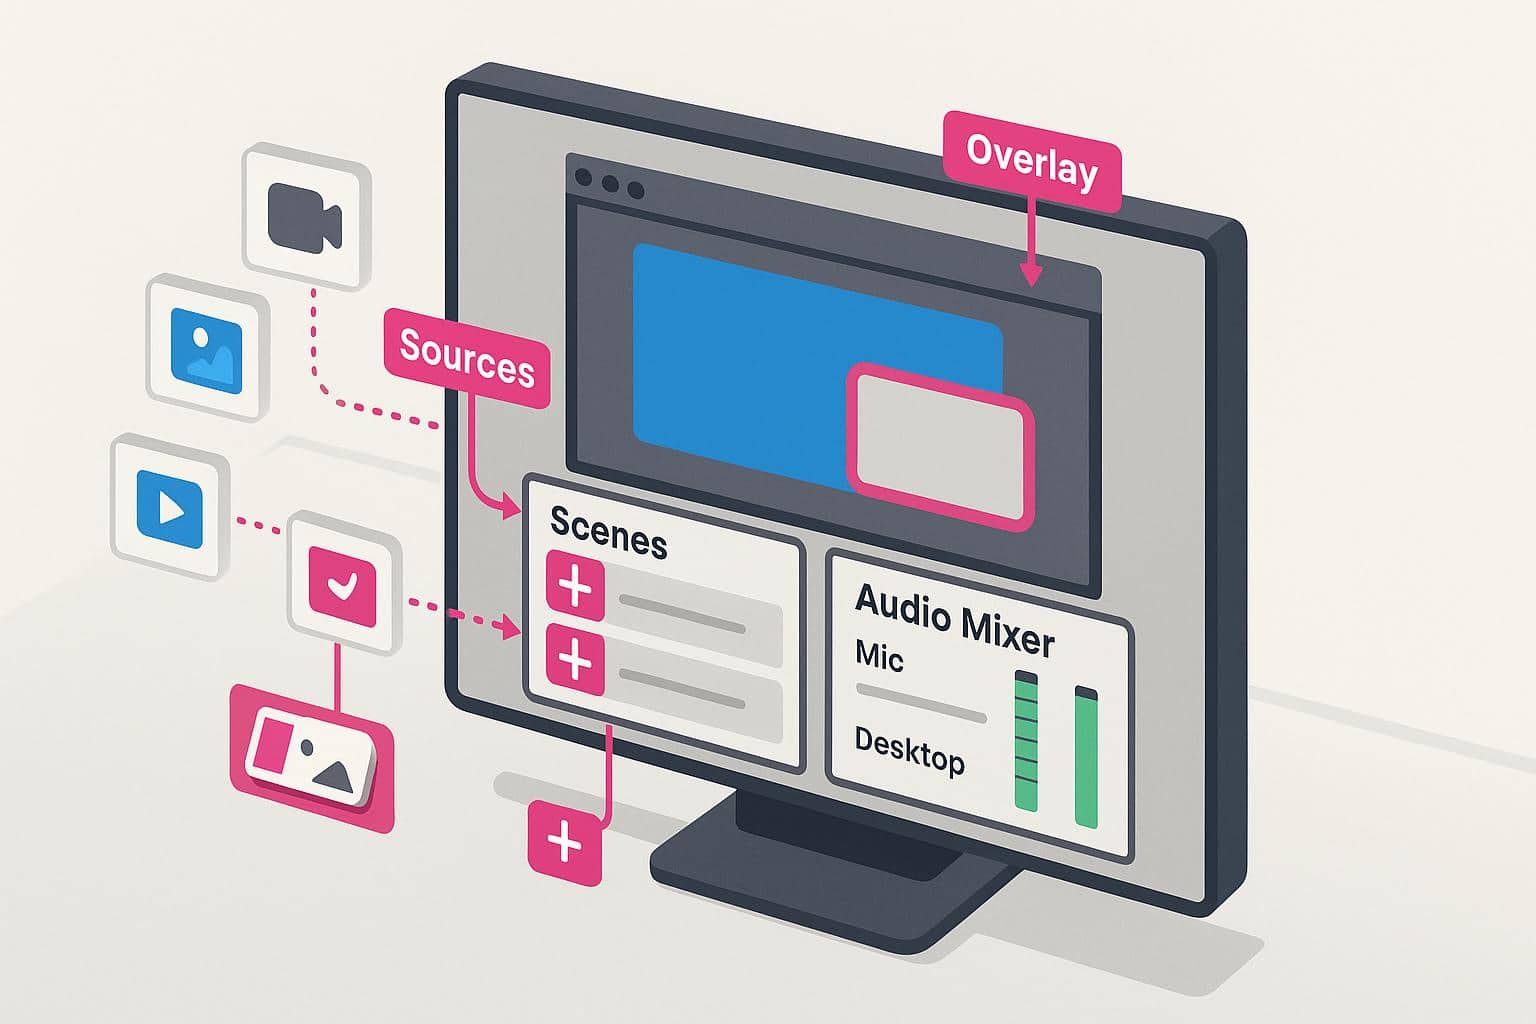
Scenes and Sources: Webcam, Display/Game Capture, Overlays
Most of your livestream setup will happen in two sections of OBS: scenes and sources. Scenes refer to the different screens that you will broadcast to your viewers, while sources are the components required to create each specific scene. Outside of the mainstream screen, most people like to create additional scenes for a better stream flow, such as an intro and outro scene.
To create a scene in OBS:
- Click on the plus sign under Scenes in the bottom left corner.
- Enter the name of your scene.
- Click OK.
Creating a source requires a few additional steps, depending on what type of source you’re adding. With sources, you can add images, input/output devices, capture different application windows, and more.
To add a source in OBS:
- Click on the plus sign under Sources in the bottom left corner, to the right of Scenes.
- Select which source you’d like to add.
- Create a new source or add an existing one, then click OK.
- If needed, configure your source, then click OK.
One source you should consider adding is an overlay, which can be customized for each screen. Overlays can be either static or dynamic, so keep this in mind when adding them to your stream setup.
To add an overlay on OBS:
- Choose the scene where you’d like to add your overlay.
- Add a new source. If your overlay is animated, add a Media Source. If your overlay is not animated (static), click Image Source.
- Name your overlay and click OK.
- Add your overlay from your local files. Configure your settings, then click OK.
Audio Settings: Mic, Filters, and Monitoring
You can also add audio sources, such as your microphone and your speakers.
Here’s how to add an audio source on OBS:
- Click on the plus sign under Sources.
- Add a new audio input or audio output device.
- Choose a name for your audio input/output device and click OK.
- Select which device you’d like to use as your input/output device and click OK.
Once you add your audio input and output devices, you’ll be able to monitor them through the audio mixer. From here, you can also use the “Advanced Audio Settings” to further customize your audio setup.
Going Live: Connect to Twitch/YouTube and Test Your Stream
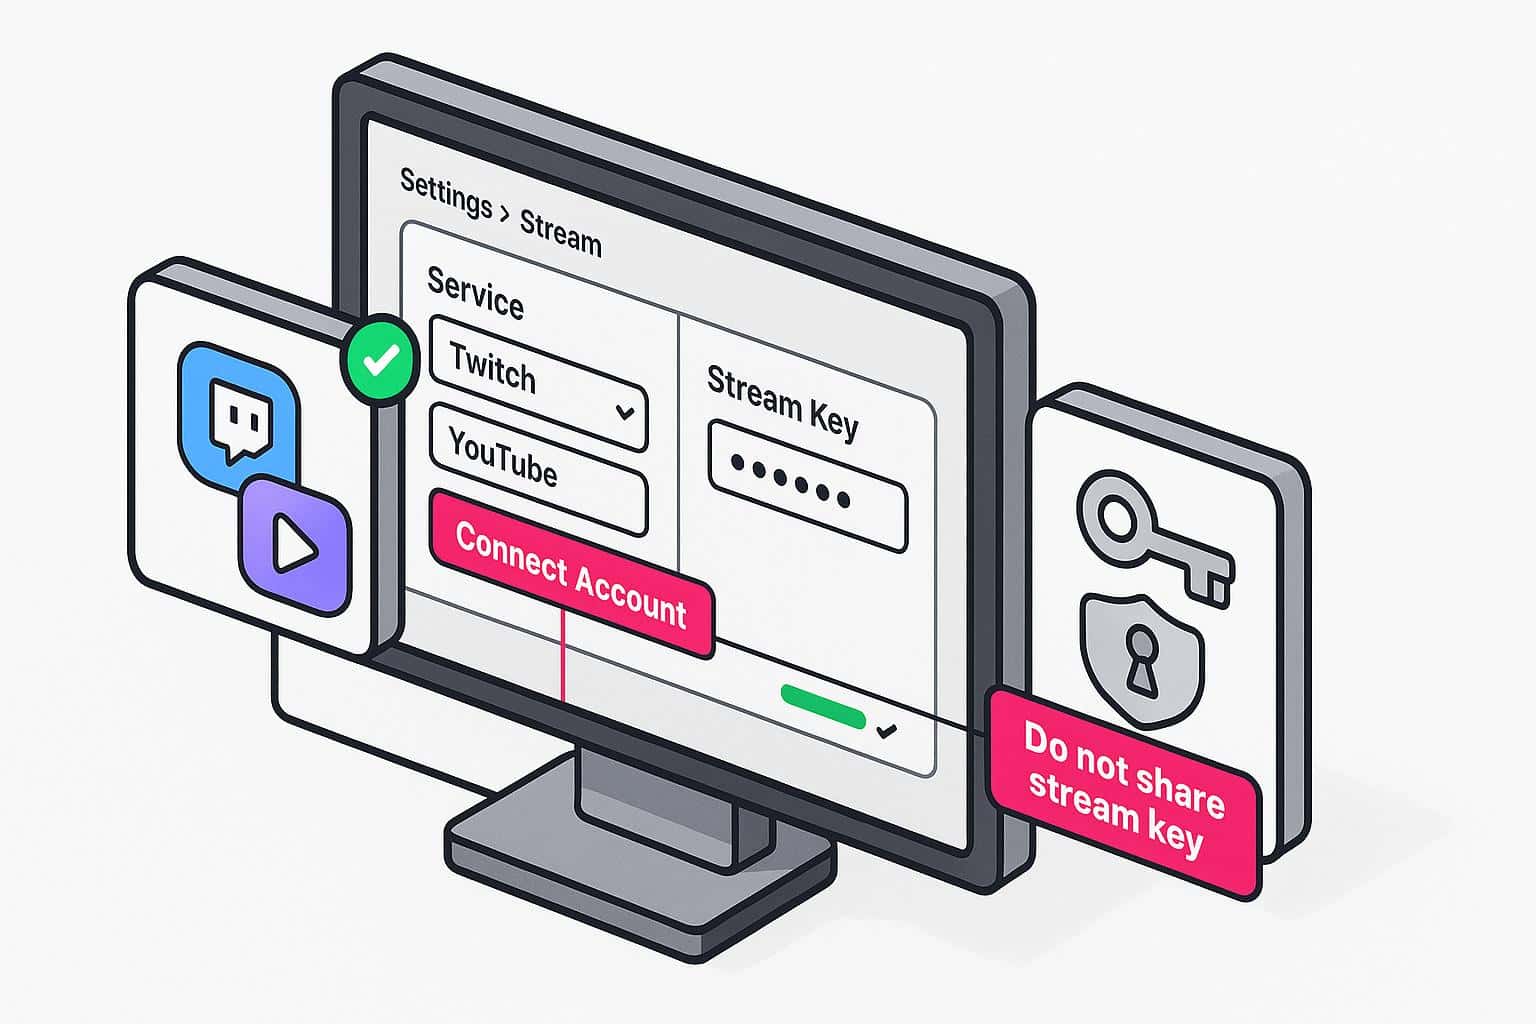
When you’re ready to start livestreaming, you’ll need to connect OBS to your chosen streaming platform so that your stream is broadcast to the correct website. This will also be useful when you’re testing your stream. Whether you decide to stream on Twitch or YouTube, you can connect to either platform using one of two options: connecting your account directly through your Twitch or YouTube account, or using a stream key.
To connect to Twitch or YouTube using your account:
- In OBS, click on File > Settings > Stream.
- In the drop-down menu, select Twitch if you plan to stream on Twitch, and YouTube if you plan to stream on YouTube.
- Click Connect Account underneath the drop-down menu.
- Log in to your Twitch or YouTube account. You’ll need to give OBS permission to access your account.
- Once OBS authenticates your stream, you’re ready to start going live!
Connecting your account directly means that OBS automatically obtains your stream key. However, you can also add your stream key manually by going to your Twitch or YouTube dashboard. It’s important to note that you should not share your stream key with anyone, as it will allow them to stream to your account.
Common Troubleshooting Issues with OBS: Dropped Frames, Buffering, High CPU
You may encounter issues when setting up OBS or using it while streaming. Some of the more common ones you may encounter and will have to troubleshoot include:
- Dropped frames: If you notice that your stream appears choppy or doesn’t render as quickly as it should, you’re likely experiencing a drop in frame rates. When this happens, one solution is to make sure you’re not running too many applications in the background, as this can overload your CPU and make it harder for your stream to run smoothly.
- Buffering: A slow internet connection or congested network can lead to stream buffers, which will interrupt your stream and negatively impact your viewers’ experiences. A common way to solve buffering is to limit the number of devices on your network by turning off Wi-Fi access for devices that aren’t actively using the internet.
- High CPU: Livestreaming can use up a significant amount of CPU resources if you’re not careful, but other factors may also contribute to high CPU usage. If you find that it’s not OBS or your applications, check to see if any background processes are running and close them. It’s also a good idea to scan your PC for any malware or software that might also be quietly using up your CPU.
Frequently Asked Questions About OBS Livestreaming
Is OBS free to use?
Yes, OBS is an open-source software and is 100 percent free to use.
Do I need a gaming PC to use OBS?
While a gaming PC is powerful and is capable of running OBS with your applications, any PC can be used to run OBS as long as it meets its minimum system requirements.
Where can I find overlays and alerts for my stream?
Livestream overlays and alerts can be found online through different websites, but you can also make your own. Alternatively, you can find stream overlay or alerts artists and commission them to make custom assets for you.
What is the recommended internet speed to use OBS?
The ideal internet speed depends on the amount of bandwidth your livestream needs. Your livestream quality will depend mostly on your upload speed, so use that to gauge your recommended internet speed. A good upload speed for livestreaming OBS is usually between 12 to 20 Mbps.
What is the best internet type to use when livestreaming with OBS?
When livestreaming, it’s best to use a fast and reliable internet connection type, such as fiber or cable. Plugging in an Ethernet cable directly to your PC will ensure that your livestream can run uninterrupted. Service providers like AT&T and Xfinity offer fiber and cable internet plans, so check which ones provide service in your area before investing.