How to Set Up Internet at Home: Guide to Wi-Fi Network Setup
Setting up your Wi-Fi network is easier than you may think.
- Setting up a home Wi-Fi network yourself can save money over professional installation.
- Optimal placement of the modem and router is crucial for maximizing Wi-Fi signal strength.
- Safeguard against unauthorized access and cyber threats by securing your Wi-Fi network.
While setting up your own home internet for the first time can initially seem stressful, the savings compared to professional installation make it worth the learning process. Anyone can set up a home Wi-Fi network with some technical skill and patience. In this guide, we’ll walk you through the straightforward steps to establishing a home internet network and provide you with the essential tips you need to keep your new network secure.
Set Up Your Home Network in 4 Steps
- Choose your internet provider and internet plan.
- Set up your internet equipment.
- Connect your devices.
- Secure your network.
Our Video on How to Set Up Internet at Home
Need a TL;DR of this article? Check out the video version below:
Preparing to Set Up Home Internet
Before setting up your Wi-Fi network, you must make certain preparations to ensure a smooth setup. Here are four steps to take prior to plugging in anything:
- Choose an internet service provider (ISP). The available providers in your area will vary based on your location, and you may only have access to a few options. Use your ZIP code to find ISPs in your area. Then, determine which internet provider offers plans matching your budget and speed necessities.
- Evaluate your Wi-Fi requirements. Start evaluating your household Wi-Fi requirements by determining the number of devices that will connect to the network, the size of your home, and the typical online activities. This assessment will help you decide on the appropriate Wi-Fi technology, such as Wi-Fi 6 for faster speeds and better performance in crowded networks.
- Select your internet speed. Consider the available plans and pricing to find the one that aligns with your household’s internet needs for speed and reliability. Don’t forget to research customer reviews to understand the type of service you can expect.
- Gather all the necessary equipment. Put together your modem, a router, an Ethernet cable, and any additional accessories that came with your self-installation kit into one space. Be sure you have the required login credentials from your ISP, and consider choosing a strong and secure Wi-Fi network name (SSID) and password during the setup process.
How to Set Up Internet at Home
Once you’ve made all of the preparation steps, you’re now ready to set up your very own home Wi-Fi network. Follow these steps to establish a strong Wi-Fi network in your household:
Determine the Location of Your Devices
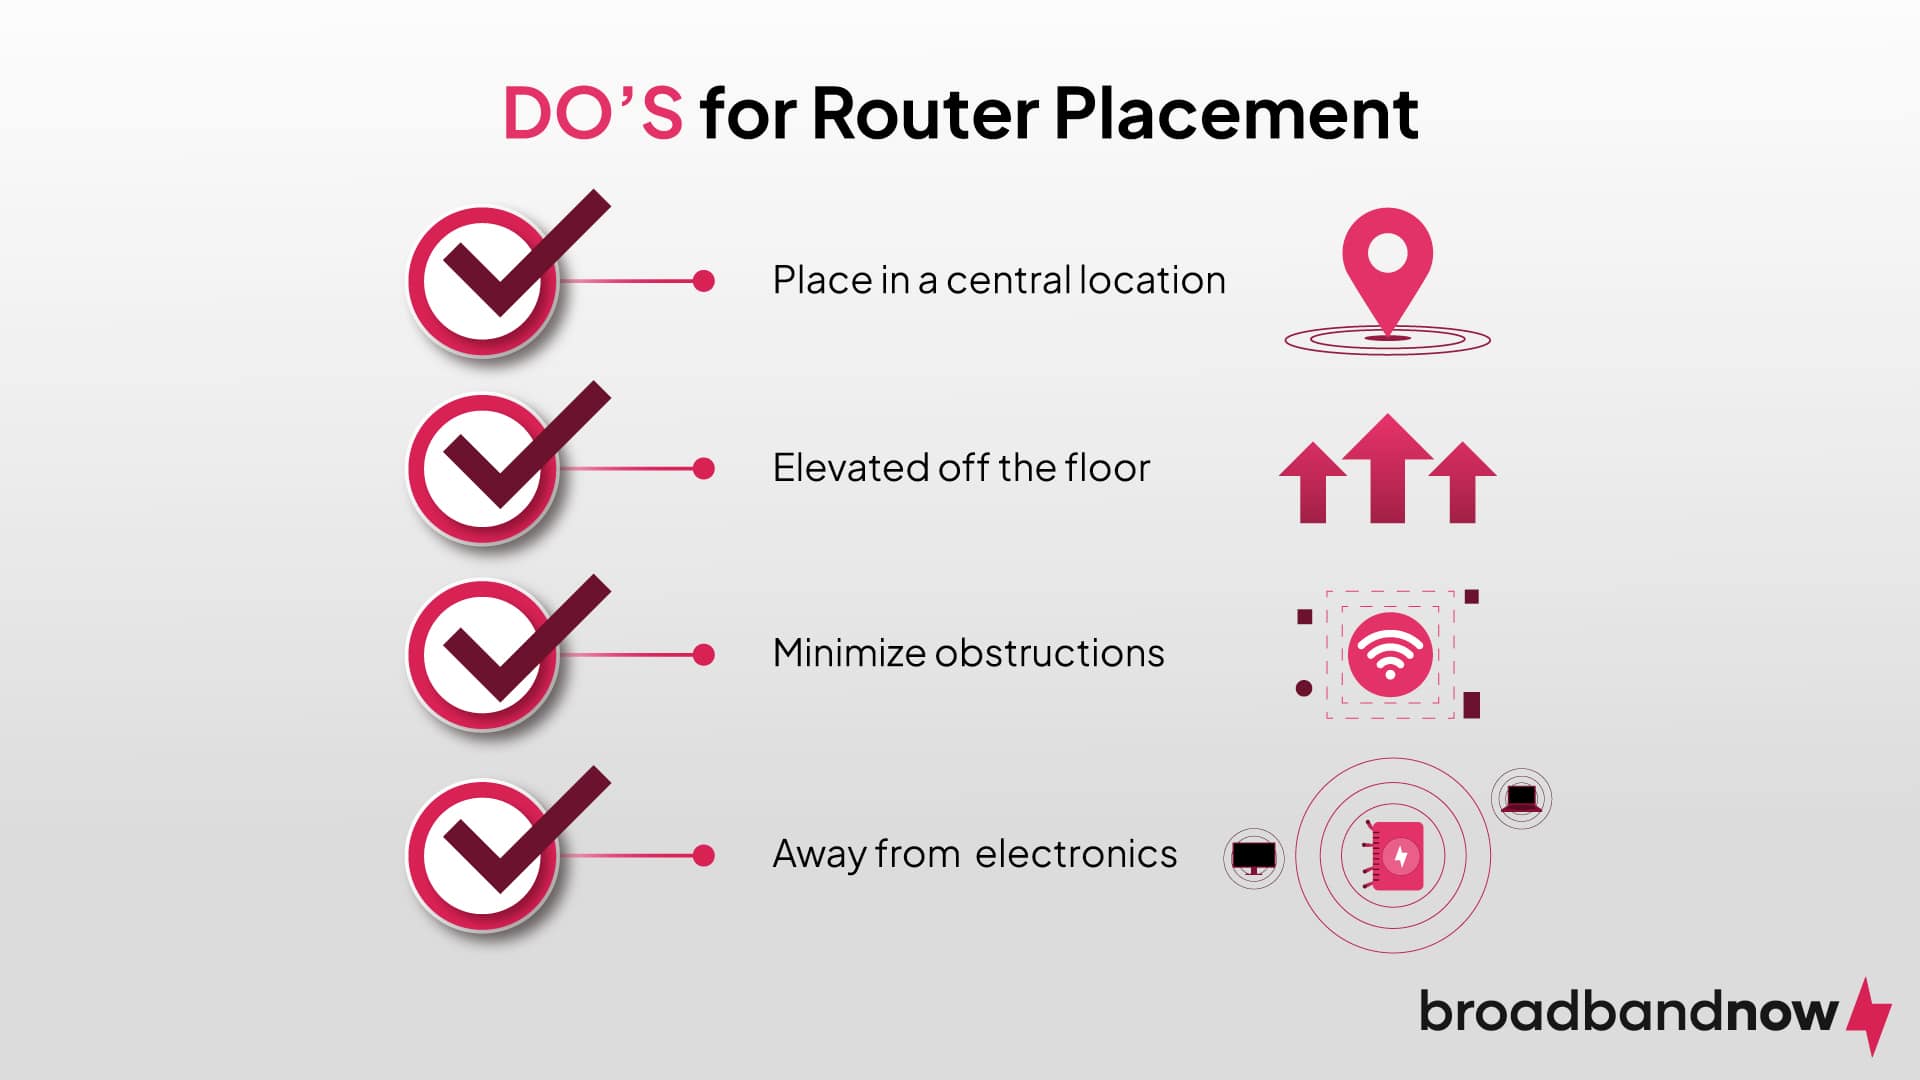
Choosing a location for your modem and router is essential to boost the Wi-Fi signal throughout your home. Typically, the best location is in the center of the home. In my home, the living room is the area that makes the most sense. You also want the location to be away from too many electronic devices or appliances, which is why the kitchen is generally not the best choice.
The modem poses only a few challenges with placement, but the router location significantly affects signal strength. Choose a router placement that’s elevated off the ground with minimal obstructions. Keeping a router on top of an end table without any other objects is usually your best choice. But work with what you have, and feel free to test out different locations to find the spot that works best.
You may be limited on where you can place your modem and router, depending on where you have to plug in your modem. Do your best to find a spot within reach of that area and adhere to optimal location practices.
Set Up Your Modem
Using the provided cord for your modem, plug it into your main internet line. This process will look different depending on the type of internet service you have. The following list explains how to connect a modem for each of the major connection types:
- Cable: Connect one end of the coaxial cable to the cable outlet on the wall. Then, attach the other end of the coaxial cable to the modem. Plug the modem into a power outlet.
- DSL: Plug one end of the phone cable into the phone jack on the wall. Then, connect the other end of the phone cable to the designated “DSL” or “Phone Line” port on the modem. Connect the modem to a power outlet.
- Satellite: Connect the satellite dish cable to the designated “Satellite In” or “Antenna In” port on the modem. Plug the modem into a power outlet. Note: The satellite setup process may involve a professional technician.
- Fiber: Connect the fiber optic cable either from the wall or the ONT (Optical Network Terminal) to the designated “Fiber” or “ONT” port on the modem. Connect the modem to a power outlet.
Before your modem can get you online, you’ll need to activate your internet service with your ISP. This links your account to your equipment so the connection works properly. Here’s how to do it:
- Locate your account details. Have your ISP account number and login information handy. Some providers also require the modem’s MAC address, usually found on a label on the device.
- Go to the activation page. Most ISPs automatically direct you to their activation portal when you open a web browser. If not, check your provider’s website or look for instructions in your setup guide (provided with your at-home setup kit).
- Follow the on-screen steps. Enter your account info and modem details if prompted. The system will verify your device and activate your service.
- Restart the modem. Once activation is complete, restart your modem to lock in the new connection.
Once all connections are in place, check the modem for a status light to ensure everything is working. It may take a few minutes for the status light to appear. Now you’re ready to connect to your router.
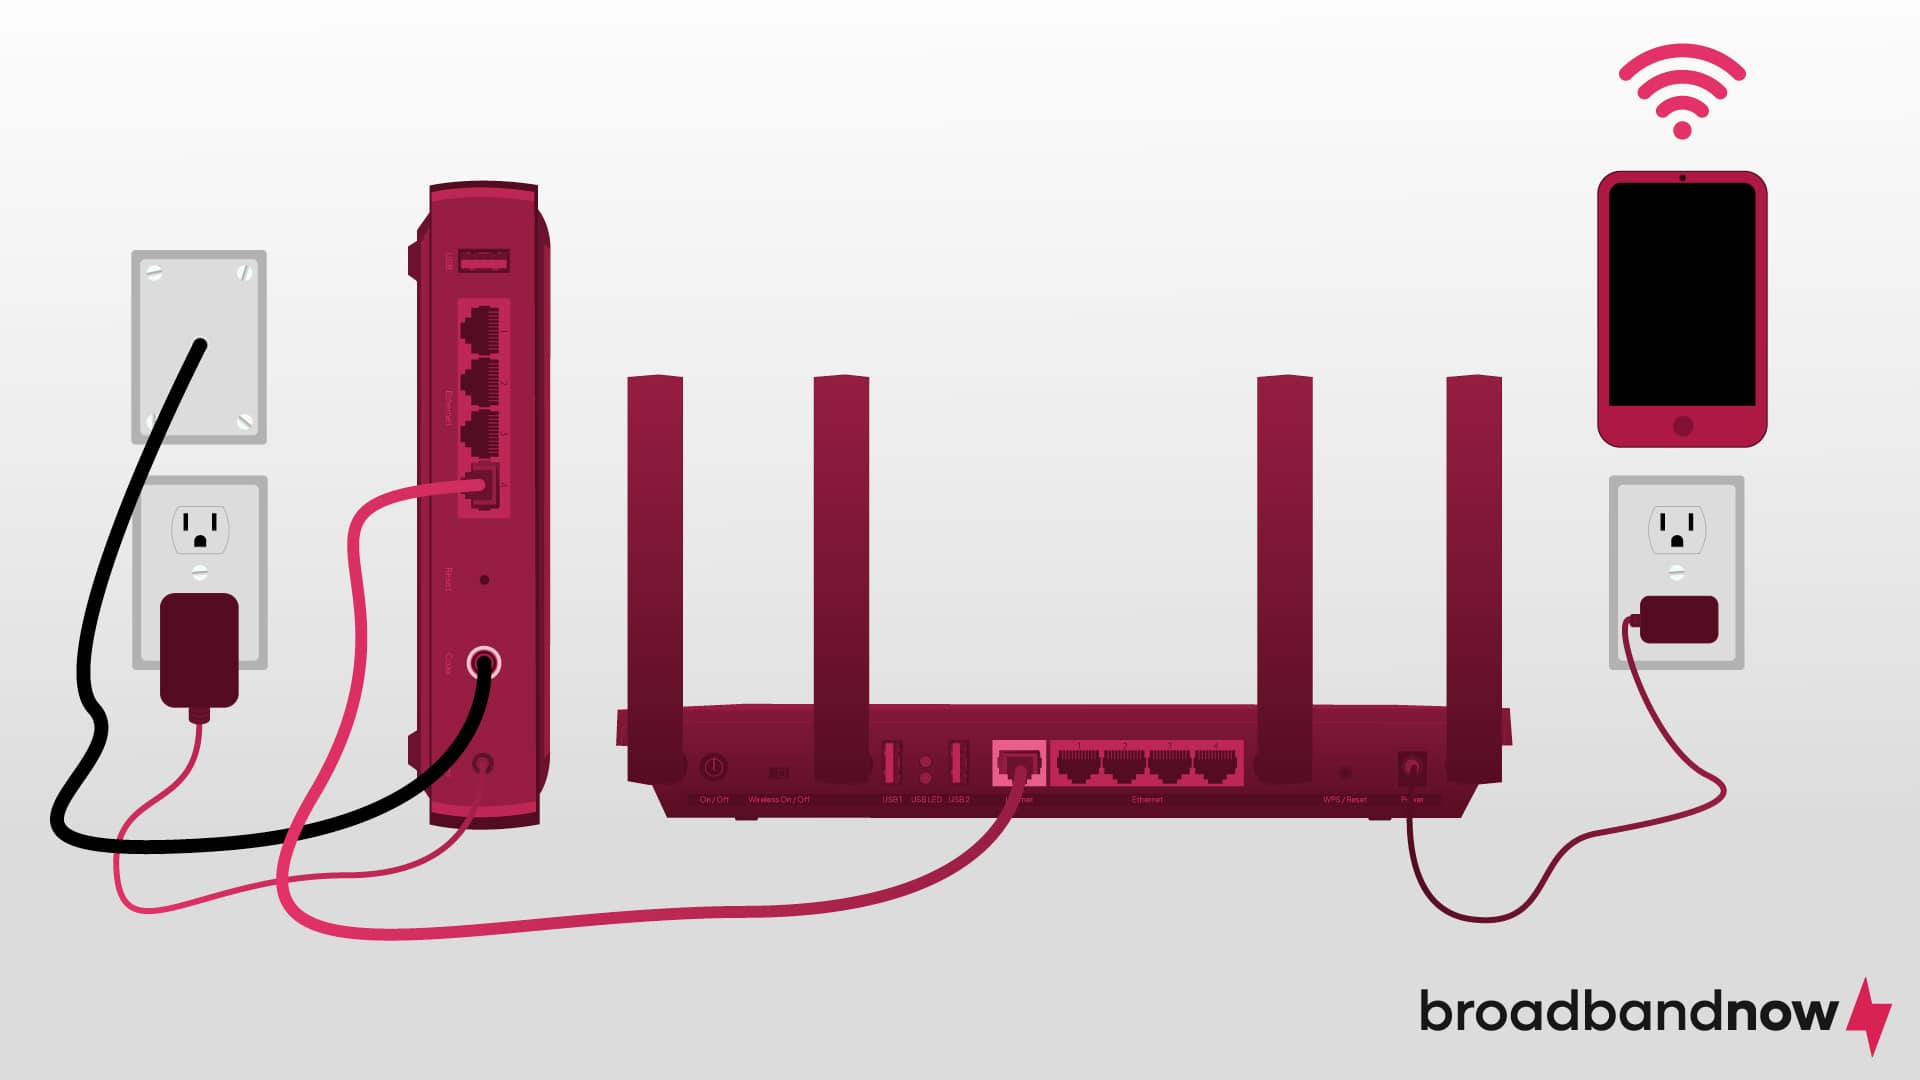
Set Up Your Router
For this step, you’ll want to connect your wireless router directly to your modem using an Ethernet cable. While the modem will typically only have one Ethernet port, sometimes you may have to find the “WAN” port for this step. Many times, companies highlight this port by using a blue color rather than yellow.
Once you connect the Ethernet cord to the modem, you’ll plug the other end into the router. If the router has more than one port, utilize the first port, usually denoted by a small “1” on the router itself. Once that’s done, connect the other end to an electrical outlet. Wait for the router status lights to indicate that the modem has established a connection between the router and the internet.
Activate Your Internet
Activating your internet will depend on your internet service provider’s protocols. In most cases, you can use the ISP’s app or their website to activate your service, with step-by-step instructions along the way. This step will require the use of a mobile device. If either is not the case for activation, the information for activating your internet will be provided with your self-installation kit. If your internet is already activated, you don’t have to worry about this step.
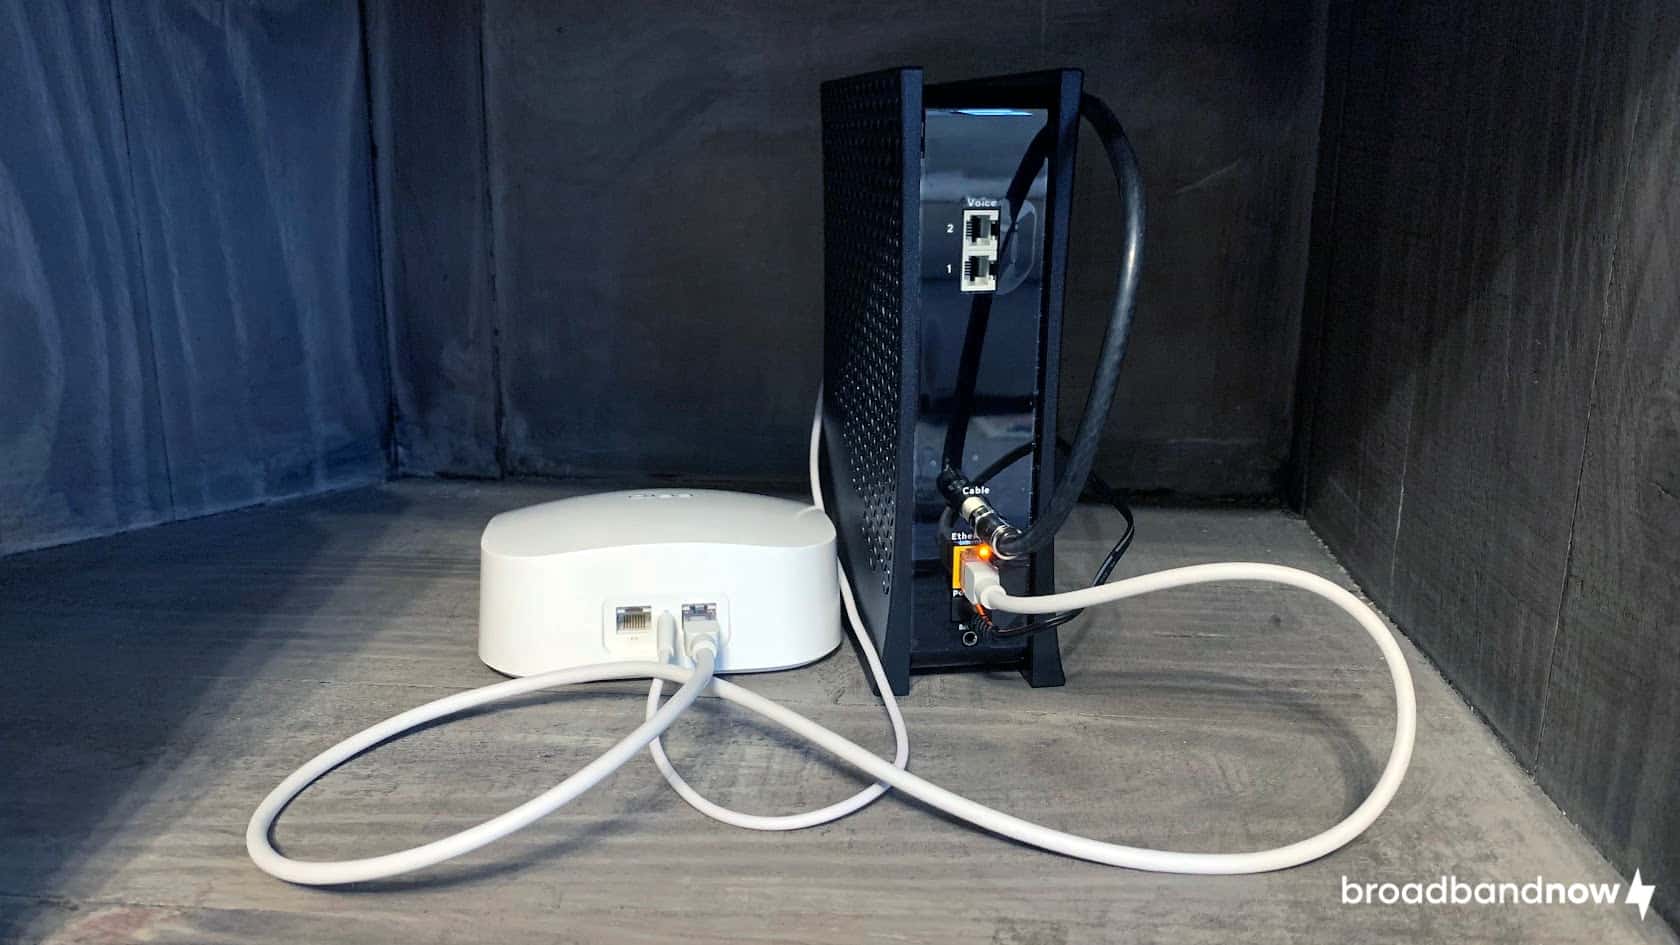
Set Up Mesh System
Using a mesh Wi-Fi system may be beneficial if your home requires a more robust Wi-Fi setup. If you are setting up a system for your home network, your system will likely provide step-by-step instructions on how to continue activating other devices.
In my home, I have an eero Pro 6 mesh Wi-Fi network. Once I set up my base router, setting up additional routers is relatively simple. To do so, find another location in your home for your router, ensuring the same best practices are followed for optimal signal strength. The location of this device is typically on another floor of the home. For homes with large square footage on a single floor, in an area on the other side of the house.
Connect these devices by simply plugging them into electrical outlets. An Ethernet cord is not required as it can be connected wirelessly to the base router. Completing setup for these devices will typically be done through the brand’s mobile app.
How to Keep Your Wi-Fi Network Secure

Securing your home Wi-Fi network is paramount to safeguarding against unauthorized access and preventing hackers from exploiting your internet connection for malicious purposes or gaining access to sensitive information. A secure network deters against data theft, protecting personal and confidential data transmitted over the network, including login credentials and financial details. It’s best to work through security practices following the Wi-Fi setup to prevent any potential cyberattacks.
Your router will come with login credentials. We highly recommend changing your Wi-Fi name and password to keep your home network secure. As you change these credentials, avoid incorporating personal details, such as your name, surname, or street address. Using information that’s relatively easy for cybercriminals to find increases the risk of potential hacking attempts. Opt for a distinctive yet easily memorable network name for you and your family. When changing your Wi-Fi password, use a mix of uppercase letters, lowercase letters, numbers, and symbols.
If you want to keep your router even more secure, enable WPA2 or WPA3 encryption in your router’s settings. These are the most secure options for protecting your network from unauthorized access. Avoid using outdated standards like WEP, which are easily hacked. It’s also a good idea to create a guest network for visitors. This keeps your main network (and all your devices) separate from anyone connecting temporarily.
Securing Your Home Network: Keep everyone in your household informed about the importance of security practices and share guidelines for safe internet usage. Explain how to access the internet safely and why keeping this information secure matters. You should also provide useful tips on navigating the internet safely. Empower everyone to do their part to keep your home network secure.
Troubleshooting Internet Setup Issues
If you run into issues during your setup, it might be due to a few common issues that can be easily fixed. Here are some setup issues you might come across. If these steps don’t solve the issue, your ISP’s customer support can usually guide you through more advanced troubleshooting.
| Problem | Solution |
|---|---|
| No internet connection | Restart your modem and router by unplugging them for about 30 seconds and then plugging them back in. If that doesn’t work, check for a service outage on your ISP’s website or app. |
| Weak Wi-Fi signal | Move your router to a more central location, away from walls or large appliances that can block the signal. |
| Can’t log in to router settings | Make sure you’re connected directly to the router via Wi-Fi or Ethernet. Enter the router’s default IP address into your browser. If you’ve forgotten your login credentials, you may need to reset the router to factory settings and use the default username and password listed on the device |
Frequently Asked Questions About Home Internet
Do I need an Ethernet cable to set up a wireless router?
Yes, an Ethernet cable is required when setting up a wireless router because it establishes the initial connection between the router, the modem, and the internet. During the initial setup, connecting the router to the modem via an Ethernet cable allows you to access the router’s interface and configure settings, such as network name and password.
Do I need both a modem and a router?
Yes, a modem and a router are both required to set up Wi-Fi because they each serve different functions. A modem establishes the connection between your home network and the internet service provider to create the gateway to the internet. A router manages the local network by assigning local IP addresses to devices and directing data traffic within the network. The router ensures efficient and secure communication within your home network, allowing multiple devices to connect to the internet wirelessly.
How much does it cost to set up a home network?
The cost to set up your Wi-Fi home network will vary based on your internet service provider. On average, the cost can range between $50 and $200. This is generally a one-time upfront expense. The price may vary depending on service type, complexity, speed, cable length, and the need for additional hardware like modems and routers. Requesting a self-installation kit is less expensive than having a professional installation and is a great hack to avoid hidden internet fees.
Is it hard to set up Wi-Fi by yourself?
No, setting up Wi-Fi by yourself is generally relatively easy, especially given the user-friendly interfaces of modern modems and routers. Most Wi-Fi equipment comes with detailed instructions, and the setup process often comes with guided instructions from the internet service provider. Unless there is a major roadblock in the connections of your household, setting up your Wi-Fi may require assistance from a technician. These types of roadblocks are usually found in older homes.
In most cases, setting up Wi-Fi is designed to be a straightforward process. Many people do it successfully without extensive technical knowledge. However, the difficulty level can vary based on your familiarity with the technology and the specific router model. If you’re uncomfortable with technology, you might find the process challenging. If you decide to do self-installation, there are resources like online guides or customer support to assist you.
Why is my Wi-Fi slow after setup?
Slow Wi-Fi can happen for a few reasons. Your router may be too far from your devices, blocked by walls, or surrounded by interference from other electronics. Try moving the router to a central location, switching to the 5 GHz band for faster speeds, or reducing the number of devices connected at once. If speeds are still sluggish, run an internet speed test. Your plan may not support the usage you need, or your ISP may be experiencing temporary slowdowns.
Can I set up the internet without a router?
Not exactly. You can connect directly to your modem with an Ethernet cable, but this only provides internet access to one device at a time and doesn’t create a Wi-Fi network. A router is essential if you want to connect multiple devices wirelessly, share files between devices, or take advantage of security features like WPA2/WPA3 encryption and guest networks. For most households, a router is a must-have.